|
| |
 |
| |
|

 |
1. Precisely measures the plating
thickness of single layer and multi layers
2. Can measure circular surface besides flat
one
3. Can measure thick plating layer more than
35μm which is difficult to measure with
nondestructive testing
4. Can store, edit, and analyze the data connecting
with a PC
5. Recalls the measurement condition; there
is no need to always set the plating/substrate
condition whenever measurement
is taken
6. Developed with user-convenience in mind
|
|
 |
 |
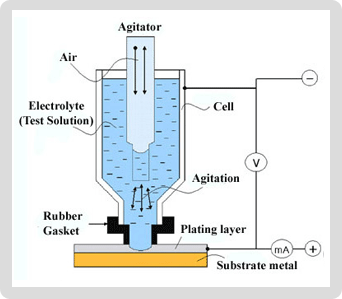
WT-CTE 700 anodically
etches the plating layer on the metal by penetrating
the test solution (reagent) which reacts to
a certain metal into the plating on the substrate.
A current goes through the reagent, the
test solution, and the WT-CTE 700 constantly
senses the differences of electric potential
between plating and substrate.
As the plating begins to be anodically
deplated and the test solution reaches to
the substrate, the difference of electric
potential starts happening.
|
|
When the plating layer is completely
deplated, the difference of electric potential
becomes maximum amount. At this moment, the WT-CTE
700 stops sensing the electric potential difference,
and it converts and calculates the difference
into measurement unit of plating thickness.
As shown in the above picture, the cell fills
with the reagent. An agitator stirs the test solution
to prevent the particle of electrolyzed plating
from precipitating and to help the WT-CTE 700
detect the difference of electric potential more
accurately.
To prevent the thickness value of the plating
from being affected by the difference of a current,
constant current device generating direct current
is equipped with electric potential of electrolysis
detector. The detector catches the point at which
the difference of electric potential becomes the
maximum. It happens when the test solution completely
penetrates through the plating and reaches the
substrate below the plating. The thickness value
of the plating in which the difference of electric
potential becomes the maximum is transmitted to
the control center of the equipment.
|
 |
|
Measurement Range
|
0.006μm |
|
Measurement Unit |
300μm |
| Minimum
Measurement Area |
2.0Φ |
| Dissolution
Speed |
0.5μm |
| Constant
Current |
2 kinds of modes; 10mA, 20mA |
| Measurement
Display |
thickness value, automatic
calculation of decimal point, plating name/substrate
name, test solution, rate of electrolysis
(current), measurement sensitivity, rate
of agitation, measurement unit |
| Agitation
Method |
Air Agitation |
| Gasket
Type |
A |
| Display
Type |
LCD, Monitor screen of PC |
Statistics
|
Average, Maximum Thickness
Value, Standard Deviation, Graph
Data Logger and Output |
| Setting
of Multi Plating Layers |
Manual |
| Indication
of Test Solution |
Manual |
| Power |
AC 230V 10%, 50 / 60 Hz, 20W |
| Dimensions
(W x H x D) |
250 x 300 x 300 (mm) |
| Consists
Of |
Coulometric Plating Thickness
Tester WT-CTE 700, Stand, Test Solution
(ES-01, ES-02), Gasket, Cell, Standard Reference
(Ni/ Cu Base, Zn/ Fe Base), Optional Accessories. |
|
|

|
|
|
